I am the mini, yeppp the Mini ;)
+25
Sal
Mark Lowe
RORY O CONNOR
Juha
Ted Creedon
canariolpa
scooby-doo1962
potiman
ovlovman
Cazzo
Ferdi
Cardy
Simon6R4
rs3
mconboy
Dr Tumbo
reeft1
gerardwrm
bmd
Hampton Caught
brian
focuswrc
sbuckley
newt5550
omer yetis
29 posters
Page 1 of 9
Page 1 of 9 • 1, 2, 3, 4, 5, 6, 7, 8, 9 
 I am the mini, yeppp the Mini ;)
Hi guys;
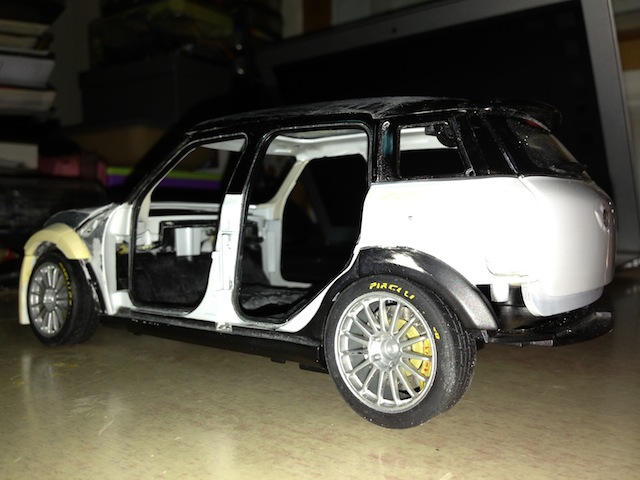
this is a project I planned, started for looong ago. recently come close to finishing the front arches... therefore, decided to share some photos with you guys to have suggestions and comments during the project....
amongst all my other on going (not going anywhere :)projects, this is another new headache for me to see unfinished on my shelves for long time ))
))
ok, so she is planning to be a tarmac lady one day
let's start with the photos then....
Rear Wing.... is one of the most important details. I actually, asked for a professional help from a guy in germany to scratch build it for me. but at the same time just want to try my skills to see how far I can go with the parts I have in hand...
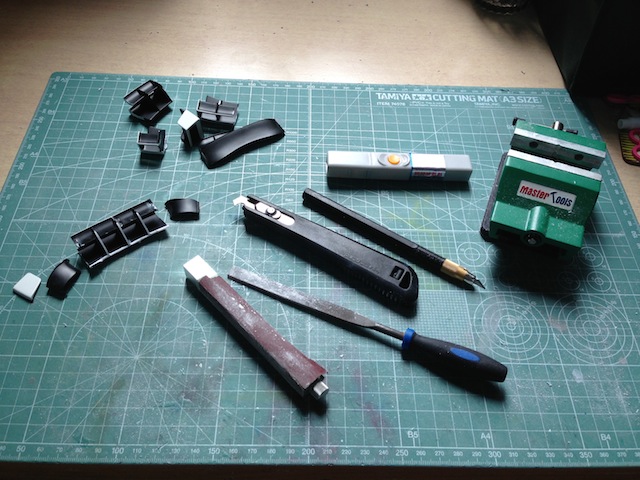
started with two Impreza WRC wings and a Xsara WRC wings. was thinking of using these parts and maybe some stryene to create the wing...
a lot of glue and men power to grind it around

and so far she is sitting like this waiting for more tackle

so, hopefully I will have the boot send over to germany to get started with the wing. and at the same time I will try to find some time to continue with mine..
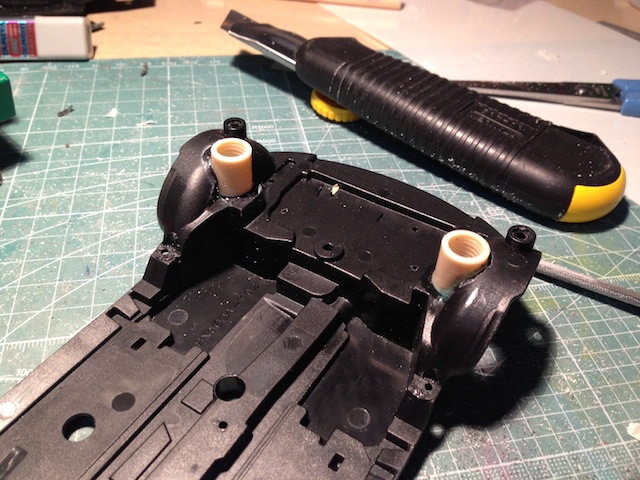
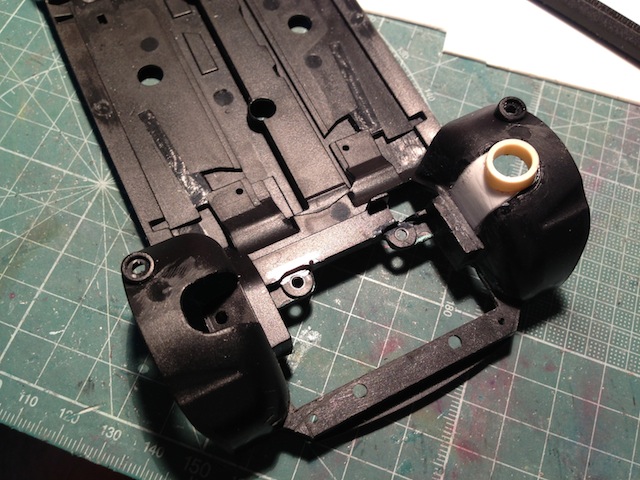
but till then, I have been also busy with the floor pan as I think needs some handsome suspension towers...

by the way, my base model is Norev 1/18....
so above is how her floor panel in original looks and below is how she looks after I did the towers...

cut the engine bay as well...
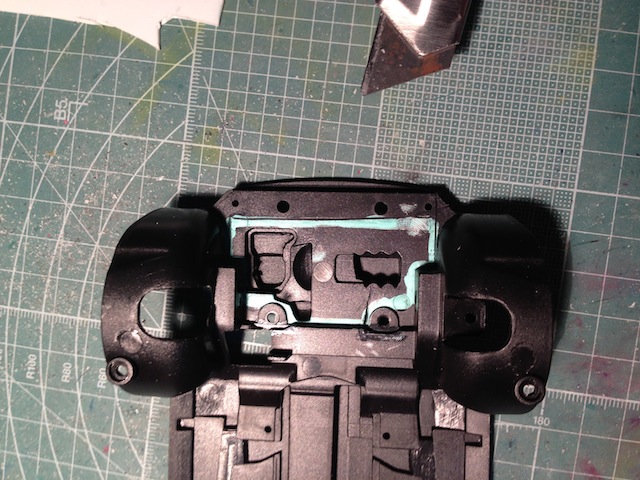
I will be using the engine of an Mitsubishi WRC '05
should looks something like this when finished

and for me one of the hardest parts started and nearly finished. It was really hard to start as this would be my first time with a putty and shaping....
I guess I did ok at last as a rookie....
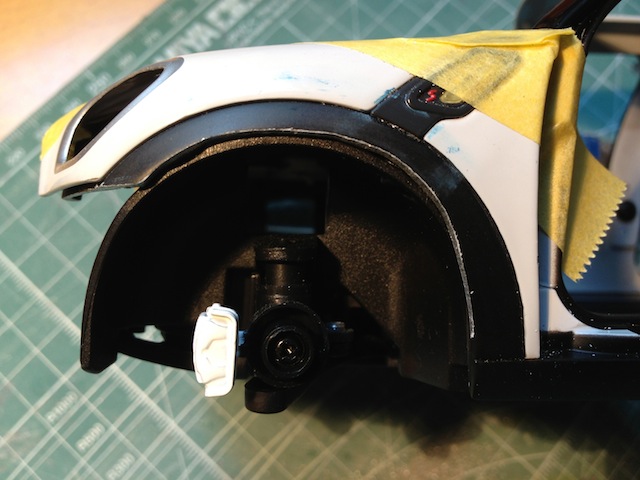
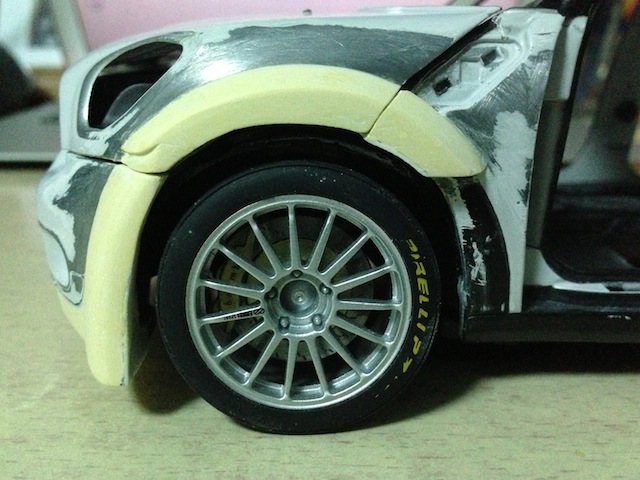
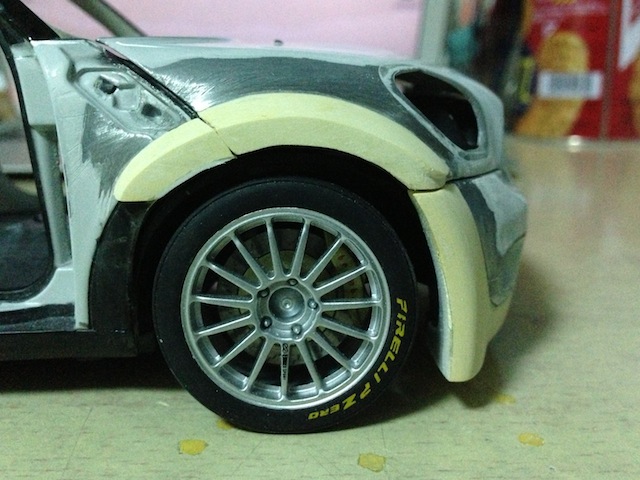
first, increased/cut out the wheel arches as I need more space for the suspension travel
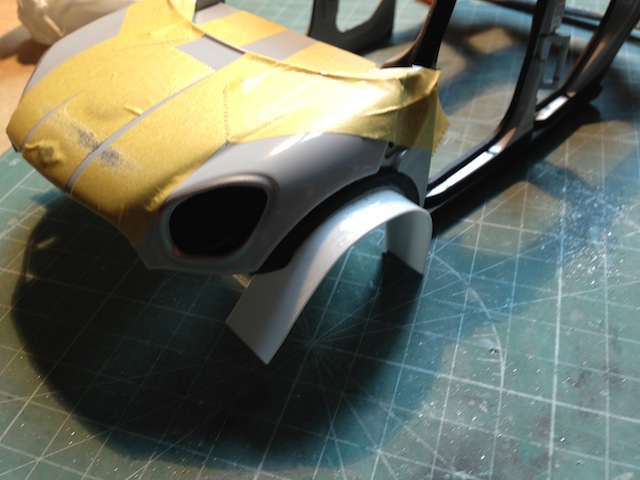
then glued some styrene to support the Polyester Putty.
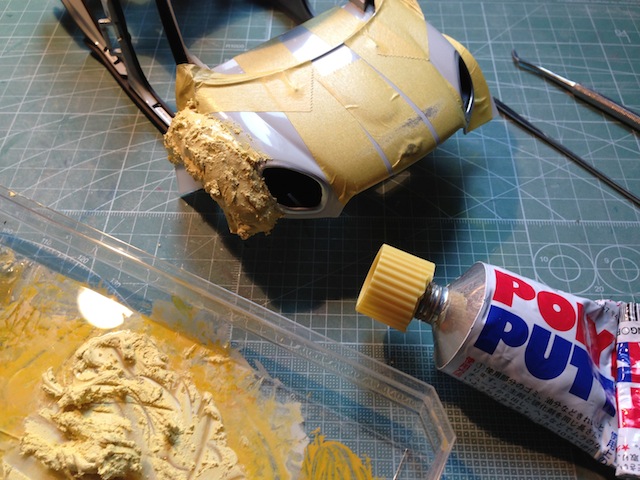
and a lot of Polyester Putty
started to shape her
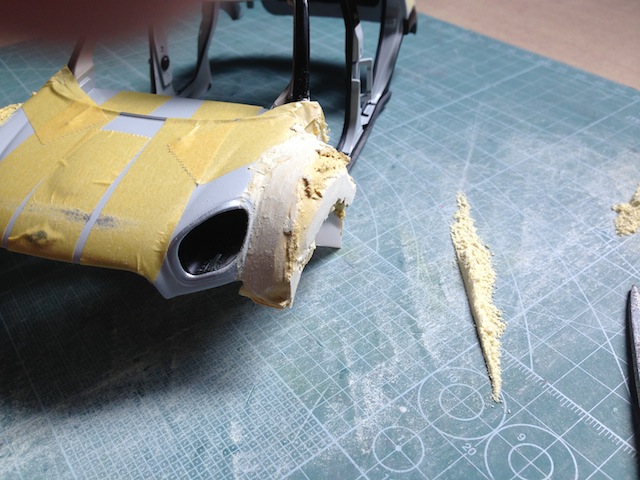
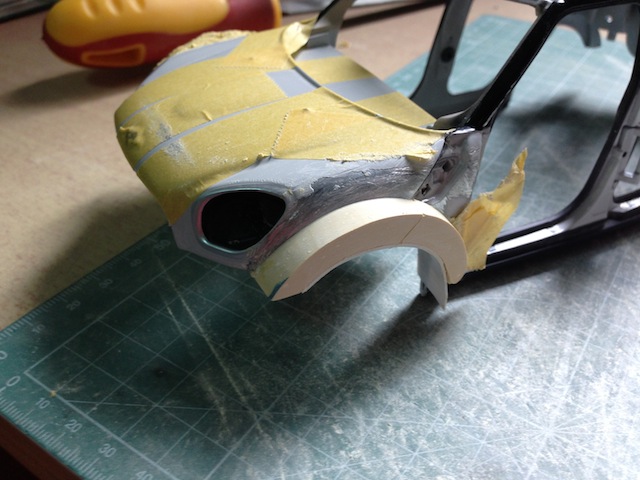
started to take some shape I guess

one side ok, then time for the other side
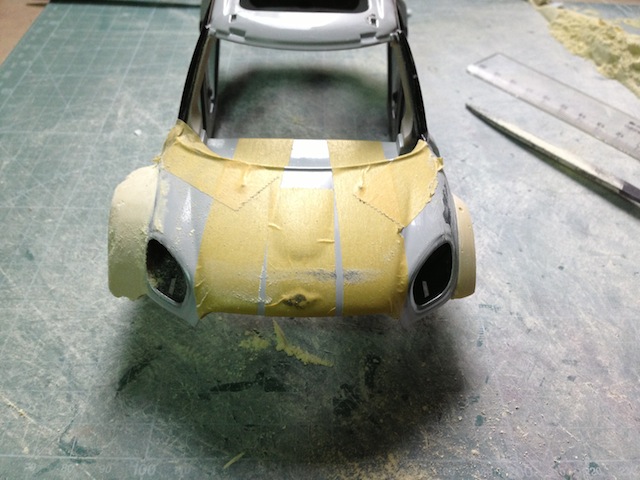
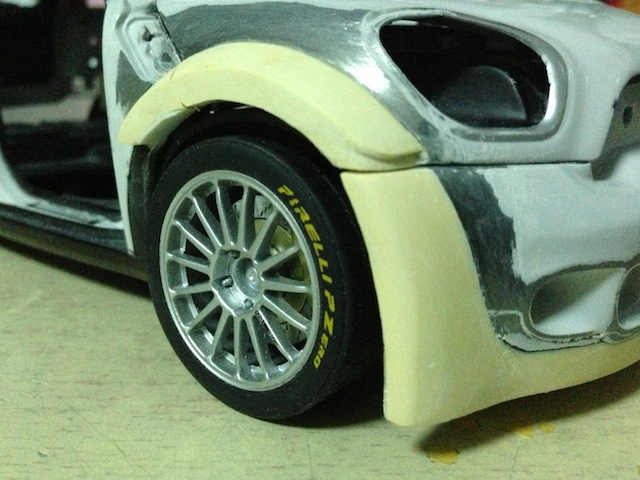
at the same time I also did the front bumper

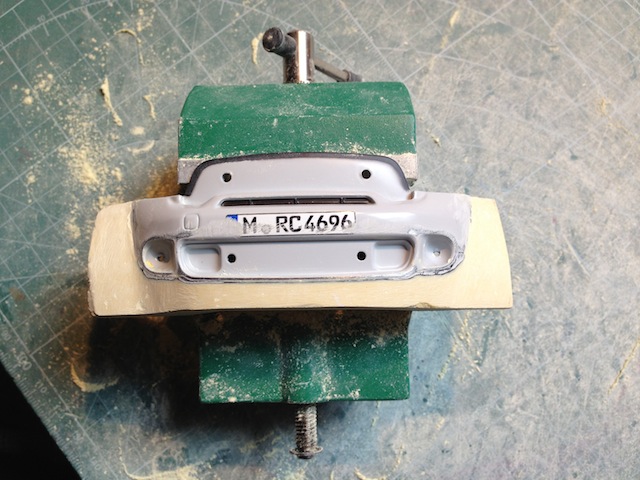
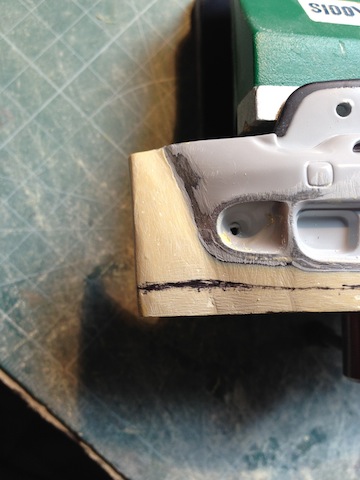
tried on the bumper to see the differences and more filling and sanding to balance between the bumper and the bonnet arches.
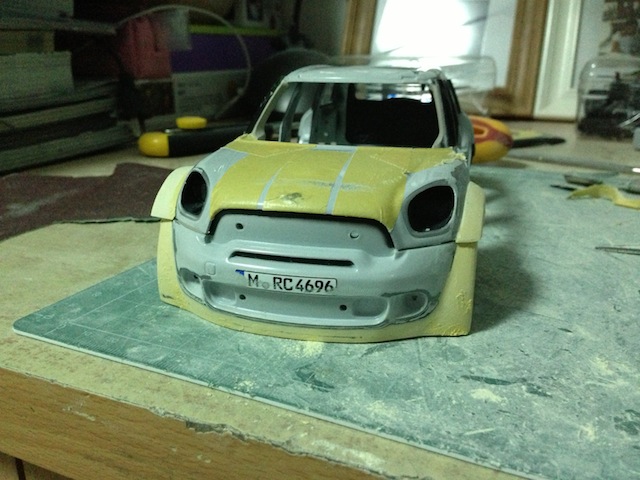
and so far here she is....
still need to fine sand and balance some areas tho, but nearly there...
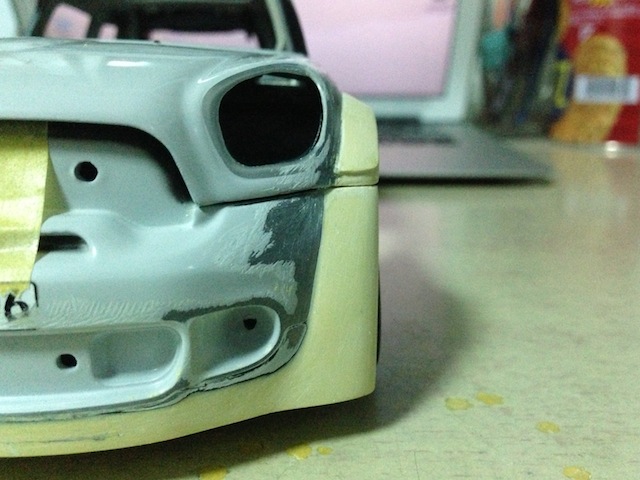

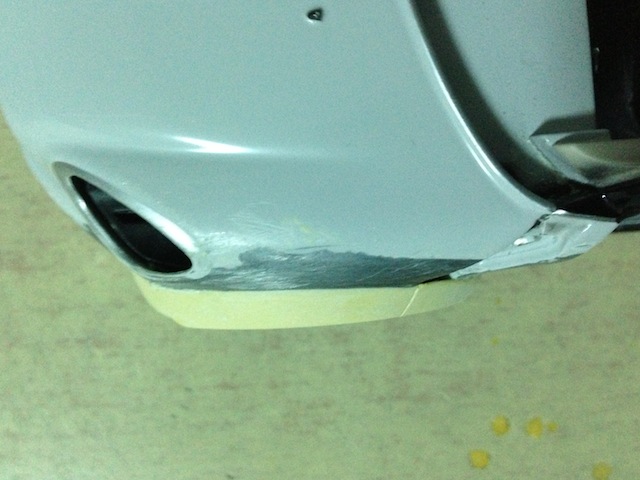
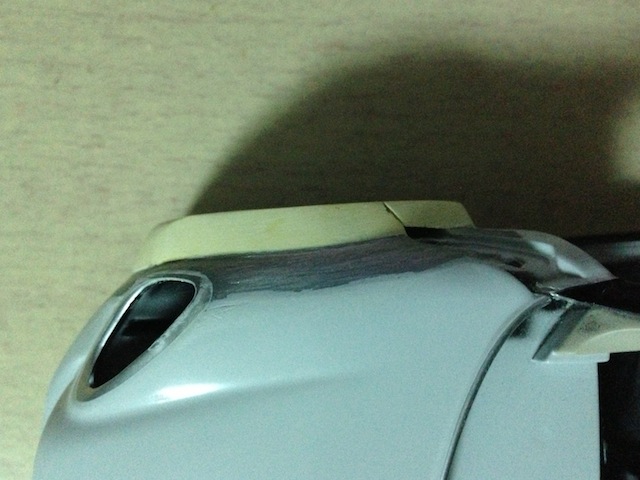
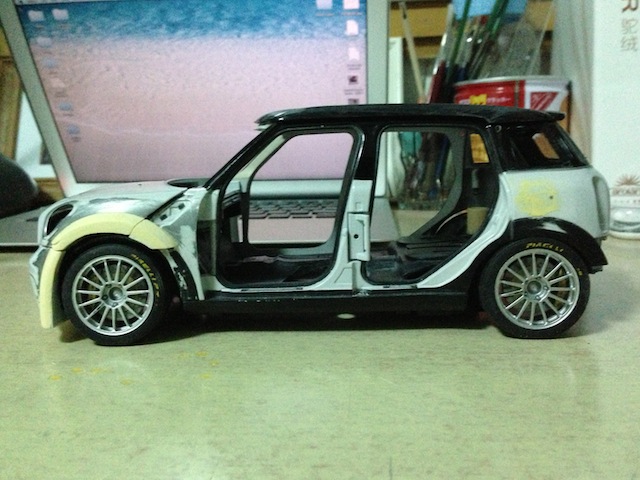

gotto do the rear's as well, offfff
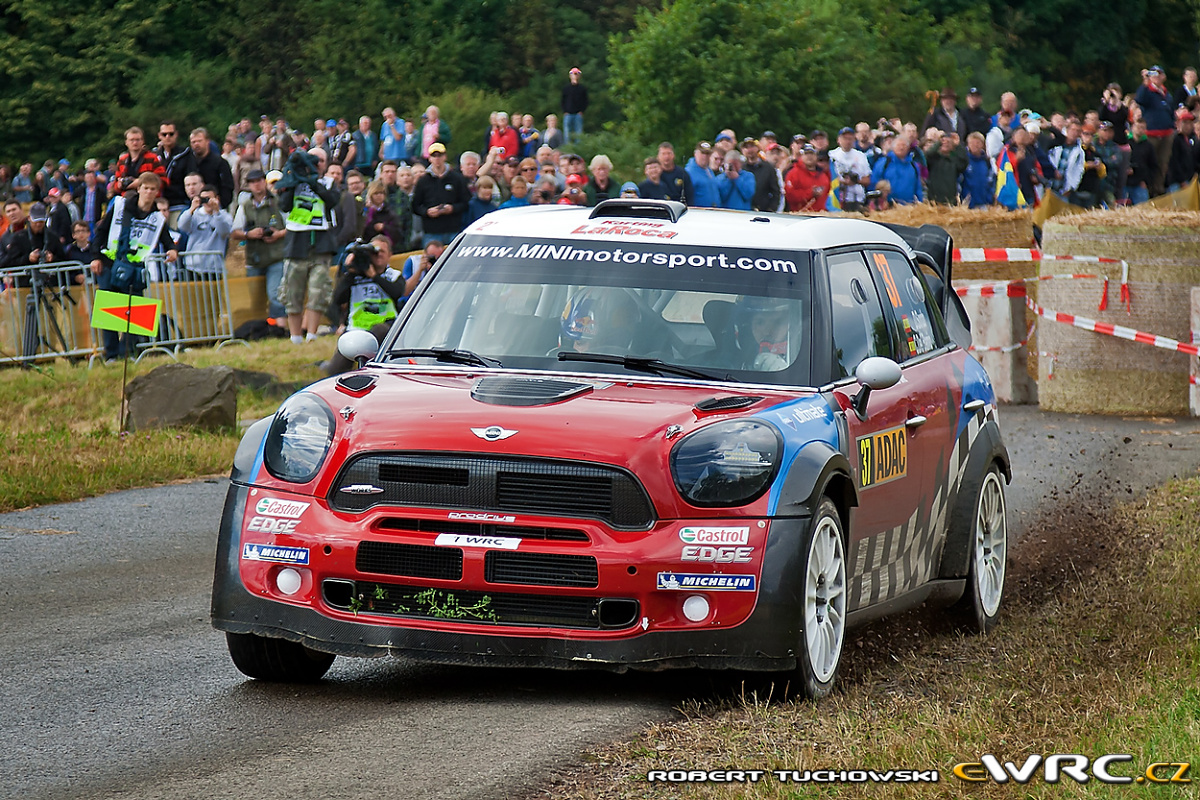
*credits and special thanks to ewrc.cz for this beautiful photo....
so, this is going to be a long time project. therefore, I will be very happy if you guys
COMMENT
SUGGEST
and
CONTRIBUTE some MINI PHOTOS...
all the best
Omer
this is a project I planned, started for looong ago. recently come close to finishing the front arches... therefore, decided to share some photos with you guys to have suggestions and comments during the project....
amongst all my other on going (not going anywhere :)projects, this is another new headache for me to see unfinished on my shelves for long time
ok, so she is planning to be a tarmac lady one day
let's start with the photos then....
Rear Wing.... is one of the most important details. I actually, asked for a professional help from a guy in germany to scratch build it for me. but at the same time just want to try my skills to see how far I can go with the parts I have in hand...

started with two Impreza WRC wings and a Xsara WRC wings. was thinking of using these parts and maybe some stryene to create the wing...
a lot of glue and men power to grind it around

and so far she is sitting like this waiting for more tackle

so, hopefully I will have the boot send over to germany to get started with the wing. and at the same time I will try to find some time to continue with mine..
but till then, I have been also busy with the floor pan as I think needs some handsome suspension towers...

by the way, my base model is Norev 1/18....
so above is how her floor panel in original looks and below is how she looks after I did the towers...


cut the engine bay as well...

I will be using the engine of an Mitsubishi WRC '05
should looks something like this when finished

and for me one of the hardest parts started and nearly finished. It was really hard to start as this would be my first time with a putty and shaping....
I guess I did ok at last as a rookie....
first, increased/cut out the wheel arches as I need more space for the suspension travel

then glued some styrene to support the Polyester Putty.

and a lot of Polyester Putty

started to shape her


started to take some shape I guess

one side ok, then time for the other side

at the same time I also did the front bumper


tried on the bumper to see the differences and more filling and sanding to balance between the bumper and the bonnet arches.

and so far here she is....
still need to fine sand and balance some areas tho, but nearly there...


gotto do the rear's as well, offfff


*credits and special thanks to ewrc.cz for this beautiful photo....
so, this is going to be a long time project. therefore, I will be very happy if you guys
COMMENT
SUGGEST
and
CONTRIBUTE some MINI PHOTOS...
all the best
Omer

omer yetis- Posts : 1325
Join date : 2012-02-18
Age : 47
Location : Shanghai/China
 Re: I am the mini, yeppp the Mini ;)
by the way, any chance to find the 3D drawings of the Rear wing?
I am not a computer guy but maybe in a workable version to do 3D printing???
CAD?
I am not a computer guy but maybe in a workable version to do 3D printing???
CAD?

omer yetis- Posts : 1325
Join date : 2012-02-18
Age : 47
Location : Shanghai/China
 Re: I am the mini, yeppp the Mini ;)
So far that is fantastic. Keep up the great work Omer 

newt5550- Posts : 6272
Join date : 2012-02-07
Age : 56
Location : Boston
 Re: I am the mini, yeppp the Mini ;)
Love your threads Omer - the level of skill and detail you put into your models is a joy to behold. Thanks for sharing and looking forward to the updates.
Sean
Sean

sbuckley- Posts : 158
Join date : 2012-02-13
 Re: I am the mini, yeppp the Mini ;)
Hi Omer looking well and great detail going into that model. Looking forward to the finish model. Will be class.
focuswrc- Posts : 1060
Join date : 2012-02-08
 Re: I am the mini, yeppp the Mini ;)
Looks great Omer
You should try contact Norev when its done, they might use yours as a base for doing a run
You should try contact Norev when its done, they might use yours as a base for doing a run
_________________
Always interested in 1/18 Irish Decals/models

brian- Posts : 2009
Join date : 2012-02-07
Age : 37
Location : Waterford
 Re: I am the mini, yeppp the Mini ;)
Terrific thread, Omer. Interesting to see the build up of your model.
I hadn't seen Polyester Putty before. Does it stick to the model well? It looks like you have got some great detail carved or sanded into the putty, which is very impressive! How easy is Polyester Putty to work with?
Keep up the good work Cheers, Steve
I hadn't seen Polyester Putty before.
Keep up the good work Cheers, Steve

Hampton Caught- Posts : 2385
Join date : 2012-02-09
Age : 56
Location : near Hampton Court
 Re: I am the mini, yeppp the Mini ;)
excellent work as always m8!! 

bmd- Posts : 7017
Join date : 2012-02-12
Age : 57
Location : here
 Re: I am the mini, yeppp the Mini ;)
Thanks for scharing whit the rest here Omer ... i see some pictures earlyer and can only say .....
FANTASTIC !! and deep deep respect !!
FANTASTIC !! and deep deep respect !!
 Re: I am the mini, yeppp the Mini ;)
newt5550 wrote:So far that is fantastic. Keep up the great work Omer
cheers mate, appreciated
sbuckley wrote:Love your threads Omer - the level of skill and detail you put into your models is a joy to behold. Thanks for sharing and looking forward to the updates.
Sean
thanks Sean,
I always try to do my models better then the previous build. try to add more details and accuracy. sometimes it pays it off...
focuswrc wrote:Hi Omer looking well and great detail going into that model. Looking forward to the finish model. Will be class.
thanks mate, glad you liked it. hope can finish her
brian wrote:Looks great Omer
You should try contact Norev when its done, they might use yours as a base for doing a run
hahaha, thanks Brian. if I can finish then I will send them some detailed photos... who knows ....
Hampton Caught wrote:Terrific thread, Omer. Interesting to see the build up of your model.
I hadn't seen Polyester Putty before.Does it stick to the model well? It looks like you have got some great detail carved or sanded into the putty, which is very impressive! How easy is Polyester Putty to work with?
Keep up the good work Cheers, Steve
thanks Steve!
well this is my first time working with polyester putty, and I can say I like the way it turned out. according to my previous experiences with regular Tamiya Putties, they usually shrink after a while and needed to refill the empty areas.
but this one which is also Tamiya, works way better.
and it seems it sticks well enough as I was really harsh on grinding and sanding. I guess it will be a good one when finished.
but have to say, so many dust and some smell in the beginning
bmd wrote:excellent work as always m8!!
cheers Billy
gerardwrm wrote:Thanks for scharing whit the rest here Omer ... i see some pictures earlyer and can only say .....
FANTASTIC !! and deep deep respect !!
thank you Gerard, glad you liked it

omer yetis- Posts : 1325
Join date : 2012-02-18
Age : 47
Location : Shanghai/China
 Re: I am the mini, yeppp the Mini ;)
Hey Omer, thanks for the feedback.
I'll have to get some Putty and have a go myself! It does look very good but I can imagine it's smelly stuff to use - perhaps an outdoor job!!
Cheers and happy progress with your MINI, Steve
I'll have to get some Putty and have a go myself! It does look very good but I can imagine it's smelly stuff to use - perhaps an outdoor job!!
Cheers and happy progress with your MINI, Steve

Hampton Caught- Posts : 2385
Join date : 2012-02-09
Age : 56
Location : near Hampton Court
 Re: I am the mini, yeppp the Mini ;)
Yep Steve;
it's a smelly one tho, need a good ventilation I guess. but shouldn't be a problem in summer.
it's a smelly one tho, need a good ventilation I guess. but shouldn't be a problem in summer.

omer yetis- Posts : 1325
Join date : 2012-02-18
Age : 47
Location : Shanghai/China
 Re: I am the mini, yeppp the Mini ;)
Very impressive

reeft1- Posts : 3415
Join date : 2012-02-14
Age : 55
Location : Essex
 Re: I am the mini, yeppp the Mini ;)
reeft1 wrote:Very impressive
thanks mate!

omer yetis- Posts : 1325
Join date : 2012-02-18
Age : 47
Location : Shanghai/China
 Re: I am the mini, yeppp the Mini ;)
you guys might like it
How it's build....
https://www.youtube.com/watch?v=sKneZuyNSG4&feature=player_embedded
How it's build....
https://www.youtube.com/watch?v=sKneZuyNSG4&feature=player_embedded

omer yetis- Posts : 1325
Join date : 2012-02-18
Age : 47
Location : Shanghai/China
 Re: I am the mini, yeppp the Mini ;)
hi guys;
after the mini build video, I decided to go for more details on the chassis. found some more detailed high resolution photos on the net and decided tackle the challenge....
so here below are some photos of last weekend's progresses
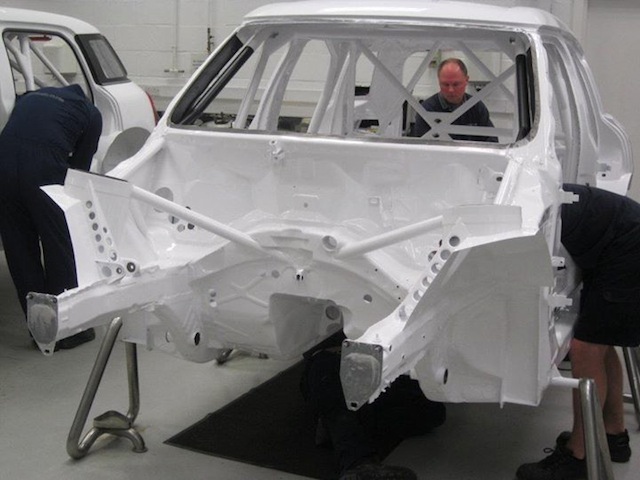
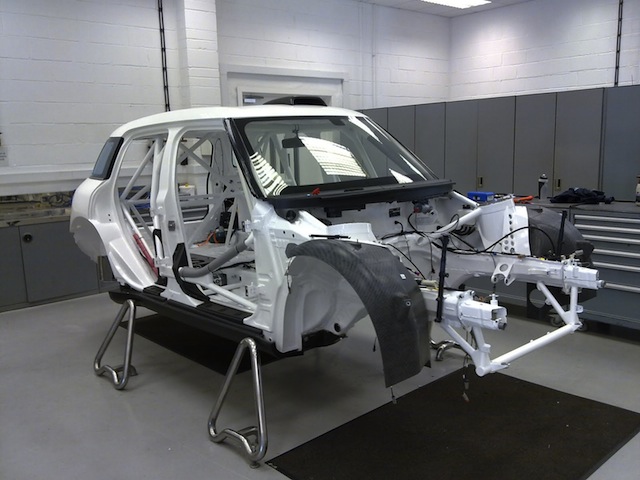
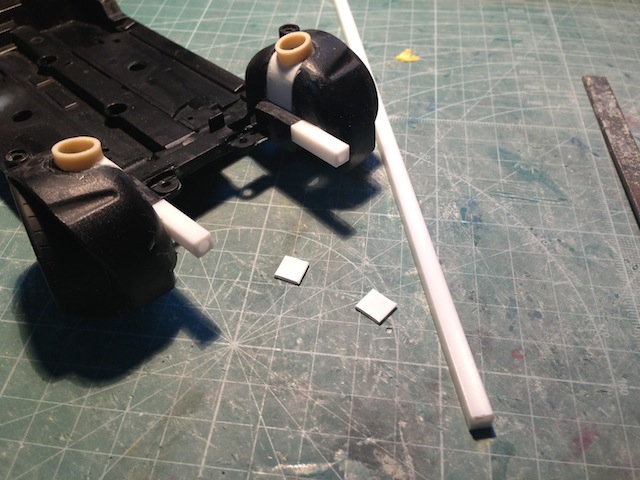
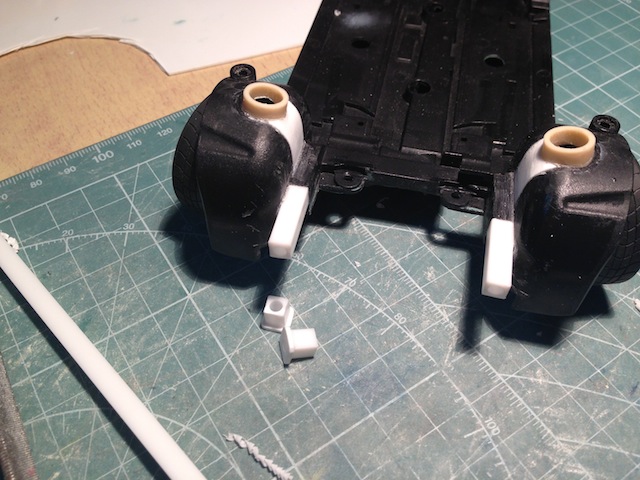

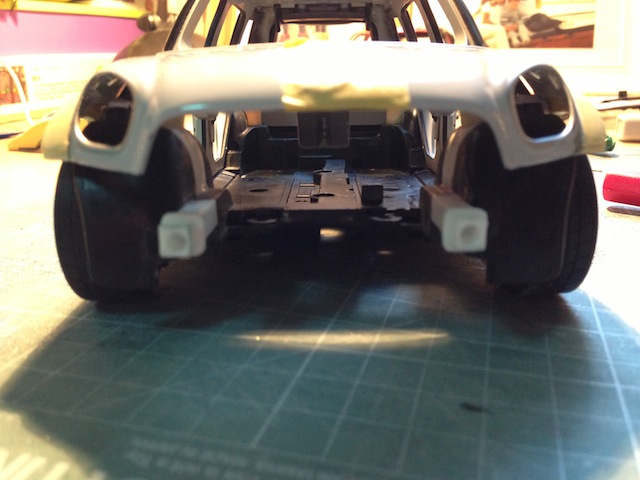
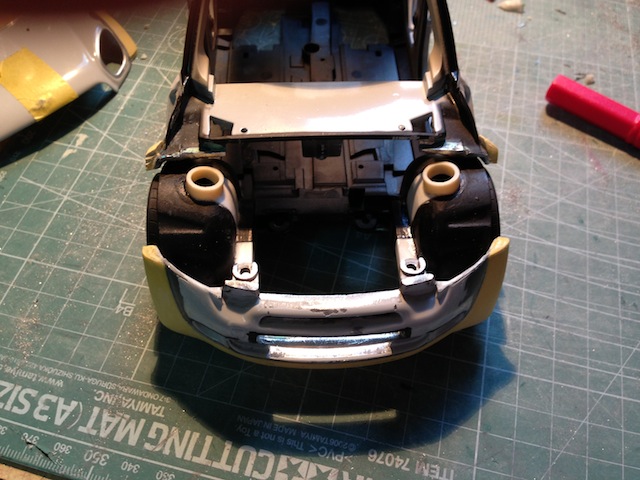
and then had to partially cut the body as the front suspension towers were not fitting well. first I decided to cut some part to have bigger space for the towers.
but I feel doesn't look good and correct.
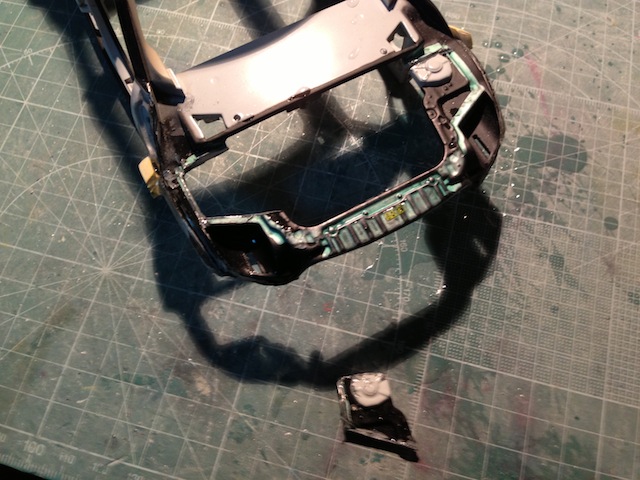
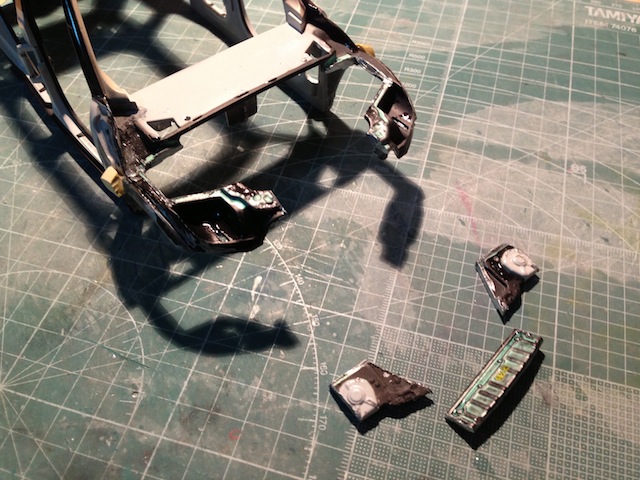
after cutting the body to allow some space for the new towers, this is how it looks...

one of the main reason I cut some was because the front bumper is screwed onto the front panel. so, had to leave the screws in place...
but then I figured out that I can fit the front bumper onto the chassis, so I decided to build the front bumper detachable
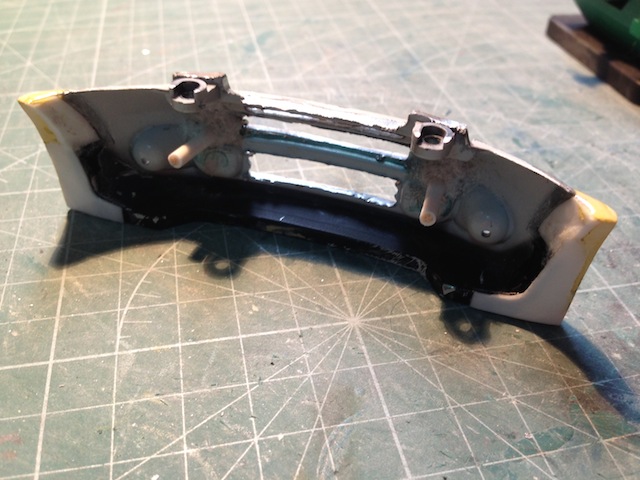
so, I cut the whole front panel, which gives more accurate look to the original car...
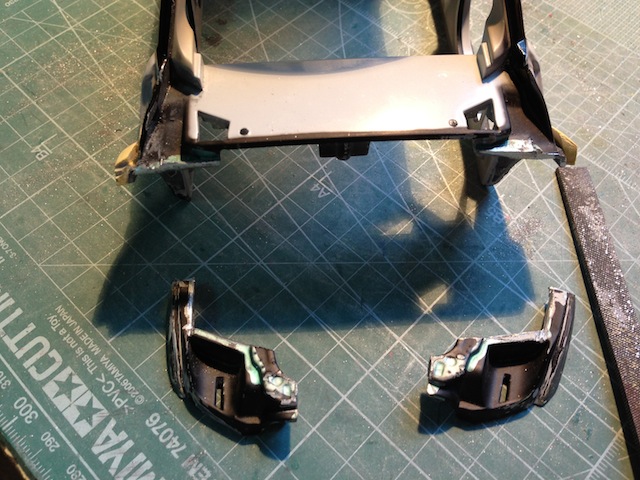
this is how the front bumper attached to the chassis
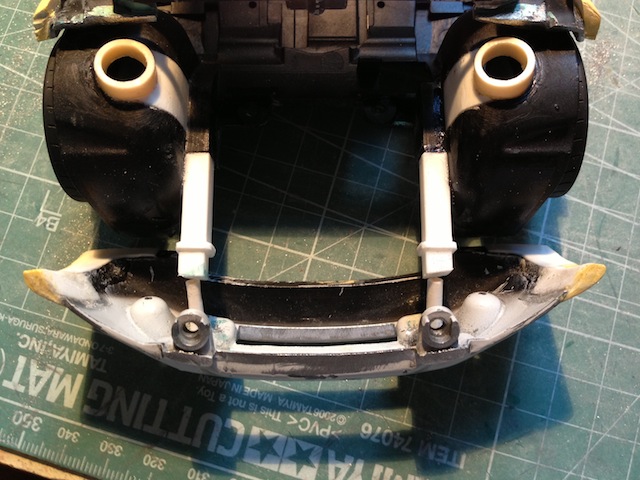
and how she looks....
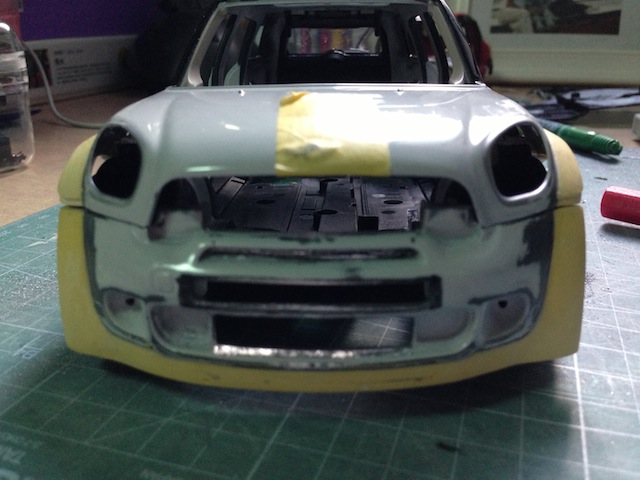
I also cut the bumper air inlets as Norev sealed these areas...

so this is how she looks with the new set up
still have to fit and fix some areas
till next update....
after the mini build video, I decided to go for more details on the chassis. found some more detailed high resolution photos on the net and decided tackle the challenge....
so here below are some photos of last weekend's progresses


and then had to partially cut the body as the front suspension towers were not fitting well. first I decided to cut some part to have bigger space for the towers.
but I feel doesn't look good and correct.


after cutting the body to allow some space for the new towers, this is how it looks...

one of the main reason I cut some was because the front bumper is screwed onto the front panel. so, had to leave the screws in place...
but then I figured out that I can fit the front bumper onto the chassis, so I decided to build the front bumper detachable

so, I cut the whole front panel, which gives more accurate look to the original car...

this is how the front bumper attached to the chassis

and how she looks....

I also cut the bumper air inlets as Norev sealed these areas...

so this is how she looks with the new set up
still have to fit and fix some areas

till next update....

omer yetis- Posts : 1325
Join date : 2012-02-18
Age : 47
Location : Shanghai/China
 Re: I am the mini, yeppp the Mini ;)
Super high detail!

reeft1- Posts : 3415
Join date : 2012-02-14
Age : 55
Location : Essex
 Re: I am the mini, yeppp the Mini ;)
Good going, Omer. Lovely build.
It is very interesting seeing the level of detail you can get to with your larger scale model. I only have 1/43 scale, and aim to keep it that way, so won't be going to the extremes you have gone to. I admire your work. Keep it going and thanks for sharing it with us.
Cheers, Steve
It is very interesting seeing the level of detail you can get to with your larger scale model. I only have 1/43 scale, and aim to keep it that way, so won't be going to the extremes you have gone to. I admire your work. Keep it going and thanks for sharing it with us.
Cheers, Steve

Hampton Caught- Posts : 2385
Join date : 2012-02-09
Age : 56
Location : near Hampton Court
 Re: I am the mini, yeppp the Mini ;)
reeft1 wrote:Super high detail!
2nd that.

newt5550- Posts : 6272
Join date : 2012-02-07
Age : 56
Location : Boston
 Re: I am the mini, yeppp the Mini ;)
reeft1 wrote:Super high detail!
thank you mate! trying to make her as detailed as I can.
each time I try something new ends up need to fix or build another part
Hampton Caught wrote:Good going, Omer. Lovely build.
It is very interesting seeing the level of detail you can get to with your larger scale model. I only have 1/43 scale, and aim to keep it that way, so won't be going to the extremes you have gone to. I admire your work. Keep it going and thanks for sharing it with us.
Cheers, Steve
thanks Steve,
as mentioned above, I like 1/18 scale as I can play around more in this scale. but sometimes, I feel I am going too much into details which takes longer time to finish and I feel tired of the project
thats why I guess you guys are on the right track with 1/43's! even some of them can be very detailed... I have been seeing and following some Japanese brands like Make up. even though they don't produce rally models, their builds are amazingly nice and detailed.
and, it's pleasure for me to share my projects and have you guys comments and kind words. this is the best motivation I guess for code3 builds..
newt5550 wrote:reeft1 wrote:Super high detail!
2nd that.
cheers mate!

omer yetis- Posts : 1325
Join date : 2012-02-18
Age : 47
Location : Shanghai/China
 Re: I am the mini, yeppp the Mini ;)
omer, class work as always m8, your conversions are at the pinnacle of our hobby......some of us (ok, me!  ) are happy to replace decals and maybe wheels, but don't go to great lengths on interior, engine bays or other areas not seen, but you go the extra mile and your projects end up a credit to you.....you set the standard in 1;18 builds m8..keep it up!

bmd- Posts : 7017
Join date : 2012-02-12
Age : 57
Location : here
 Re: I am the mini, yeppp the Mini ;)
I doubt prodrive would allow a scan of one of their parts, but when they were testing the mini, they ran it with a subaru spoiler for a while. That livery would certainly stand out in your cabinate and might be an idea to fall back on if the custom one doesnt work
_________________
Always interested in 1/18 Irish Decals/models

brian- Posts : 2009
Join date : 2012-02-07
Age : 37
Location : Waterford
 Re: I am the mini, yeppp the Mini ;)
bmd wrote:omer, class work as always m8, your conversions are at the pinnacle of our hobby......some of us (ok, me!) are happy to replace decals and maybe wheels, but don't go to great lengths on interior, engine bays or other areas not seen, but you go the extra mile and your projects end up a credit to you.....you set the standard in 1;18 builds m8..keep it up!

thanks Billy, thats very kind of you!
trust me your builds are also very nice and colorful. I don't have code3 as much and colorful as you do

omer yetis- Posts : 1325
Join date : 2012-02-18
Age : 47
Location : Shanghai/China
 Re: I am the mini, yeppp the Mini ;)
brian wrote:I doubt prodrive would allow a scan of one of their parts, but when they were testing the mini, they ran it with a subaru spoiler for a while. That livery would certainly stand out in your cabinate and might be an idea to fall back on if the custom one doesnt work
thats a great idea Brian! could you please stick a photo of the very first test car please?

omer yetis- Posts : 1325
Join date : 2012-02-18
Age : 47
Location : Shanghai/China
 Re: I am the mini, yeppp the Mini ;)
certainly a nice project this one - opens up the mind to the few 1/18s i'd love to add to the collection if I had talent like this; instead i'll just drool over the pics instead
Dr Tumbo- Posts : 521
Join date : 2012-02-07
Age : 41
Page 1 of 9 • 1, 2, 3, 4, 5, 6, 7, 8, 9 
Page 1 of 9
Permissions in this forum:
You cannot reply to topics in this forum